gFur User Manual
Overview
gFur consists of two distinctive elements – gFur component that generates the shells and a material shader that makes them appear as fur strands. Currently, the GFur plugin works with skeletal meshes. Support for static meshes can be added later.
gFur component has to use a “grow mesh”. This is the mesh that will form all the layers of the fur. Each layer is a copy of the grow mesh which vertices are pushed gradually more and more “outside” as if the mesh is an inflated balloon.
Optionally, the component can use “Fur Splines”. These splines can influence the length of the fur on different parts of the grow mesh. They can also make it appear bent or deformed.
gFur shader is usually used through a material instance which makes it easier to tweak the settings. gFur comes with Standard and Advanced shaders.
Shader makes use of “Masked” “Blend Mode” which is much faster than the translucent mode.
Shader masks out large portions of the shell meshes leaving only parts that makes it look like fur strands.
Installation
1.) Start the Epic Games Launcher, in the UNREAL ENGINE main-tab, go to the Marketplace tab
2.) Search for gFur on the Marketplace and click on “Free”
3.) Click “Install to Engine” and select the desired engine version
4.) Next for
UE 4.16
go to “Epic Games\UE_4.16\Engine\Plugins\Marketplace\GFur\Shaders”
copy “GFurFactory.usf” and “GFurFactory.ush” to “Epic Games\UE_4.16\Engine\Shaders”
UE 4.17
go to “Epic Games\UE_4.17\Engine\Plugins\Marketplace\GFur\Shaders”
copy “GFurFactory.ush” to “Epic Games\UE_4.17\Engine\Shaders\Private”
UE 4.18
go to “Epic Games\UE_4.18\Engine\Plugins\Marketplace\GFur\Shaders”
copy “GFurFactory.ush” to “Epic Games\UE_4.18\Engine\Shaders\Private”
5.) gFur standard shader, textures and sample map can be downloaded for
Source Code
For full source code access, you have to register on GitHub and send your user name to “gfur@gim.studio”.
Guide
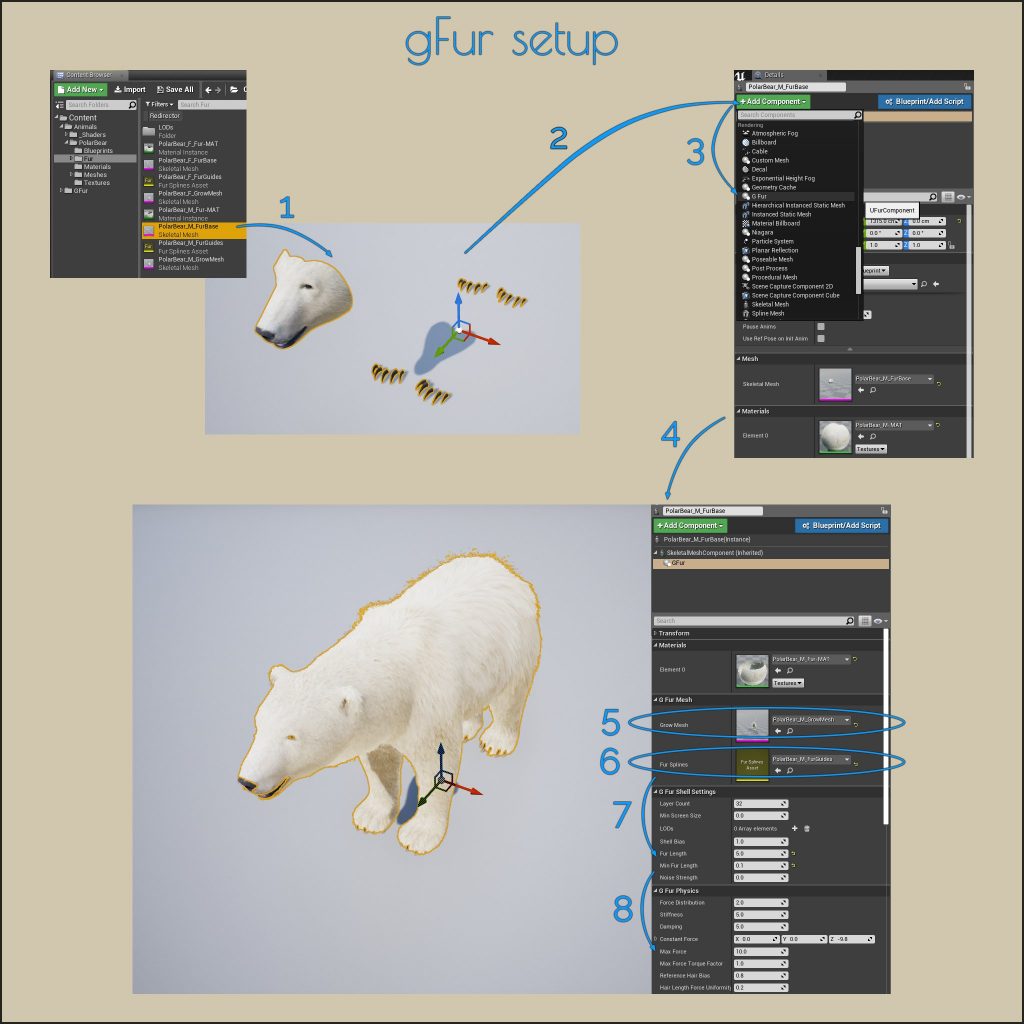
Setting up the gFur component
1.) Drag and drop a skeletal mesh into the viewport.
2.) Click “Add Component” and select “G Fur” in the “Rendering” section.
3.) With the new “G Fur” component selected, you can now assign a “Grow Mesh” and “Fur Splines”.
4.) Once the “Grow Mesh” is assigned a new slot for a material appears. G Fur shader or more commonly material instance should be assigned into this slot.
5.) “Fur Spines” are optional.
6.) At this point you can start adjusting the “G Fur Shell Settings” and “G Fur Physics”. You can read more about individual parameters in the “Reference” section of this user manual.
Example setup from our own animal.
gFur shaders and materials
gFur materials are located in “Content/GFur/Materials” and shaders are located in “Content/GFur/Materials/Shaders”.
This manual uses “shader” for the Unreal Engine network of visual scripting nodes and uses “material” for Unreal Engine material instance. It’s recommended to uses instances which make it much easier to setup the look of the fur.
Currently there is a “Standard” and an “Advanced” shader available. Standard shader is simpler version of the Advanced shader.
Features available only in the “Advanced” shader:
– colour controls for the tip of the fur strands
– second layer of fur density controls (for different fur scale on different mesh parts based on mask)
– second layer of fur thickness controls (for different strand thickness on different mesh parts based on a texture mask)
– fur clumping effect
– fur wind effect
In a typical workflow you will want to duplicate one of the gFur materials, move it to your prefered location and assign it as the “Grow Mesh” material.
Fur Splines
Fur splines are not required, but they can be very useful to shape the basic look of the fur. Without the Fur splines, fur will “grow” from the “Grow Mesh” uniformly. Still the look can be affected by the fur material, including fur length in different parts of the fur or using clumping effect.
Currently, the fur splines have to be created in third party application, the same way as they are used in the hair and fur features of these 3D applications. Splines alone are then exported via fbx file format into Unreal Engine. gFur plugin will then import them as “Fur Splines”.
Fur splines always have to start in the vertex of the “Grow Mesh”. If “Fur Splines” are used, but a “Grow Mesh” vertex is missing “it’s” spline, polygon of that vertex will be removed and fur will not grow in that spot. This behaviour can be avoided, or a missing spline can be fixed by setting the “Min Fur Length” parameter to positive value (“Min Fur Length” is located in “G Fur” component in “G Fur Shell Settings” section).
Textures
gFur materials are using a few common textures and a few fur specific textures.
Among the common textures are:
* albedo
* roughness
* normal map
Fur specific textures are:
* blend mask – these can affect where the fur grows, how long it is, can blend between second layer of density and thickness controls
* fur pattern – small, dotted texture where white spots will form the fur strands and
* black parts will remove the shell meshes
* fur noise – can be used for fur clumping and as part of the wind effect
LODs
gFur is making use of the Unreal Engine internal LOD system. For gFur LODs to work correctly, LOD meshes used for the GrowMesh have to follow the rule where vertexes can be only removed, but those that remain, can’t change their location. In other words, vertices of the LODs can be as few as required, but those that remain have to correspond to the vertices of the main “Grow Mesh” in their 3D location.
Reference – gFur Component
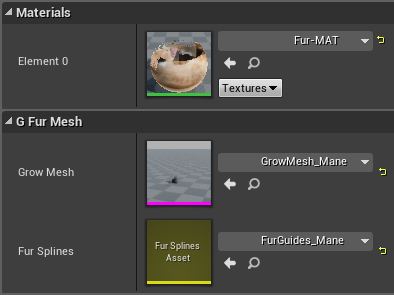
G Fur Mesh
Grow Mesh – Mesh that will form the shells of the fur. Can be same as the main mesh or just part of it.
Fur Splines – Splines that guide the growth of the fur shells. At the moment it has to be generated in 3D app and exported to Unreal Engine via fbx.
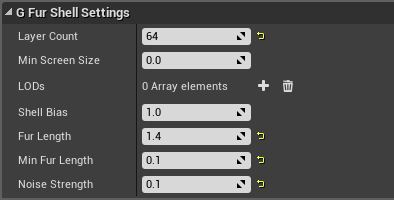
G Fur Shell Settings
Layer Count – Sets the number of shells. Less = better performance.
Min Screen Size – If the fur becomes too small on the screen it will disappear for better performance. The lower the number the longer the fur remains on the screen even if small.
LODs – LODs for better performance can be setup here.
Screen Size – Size of the fur on the screen at which the LOD will be used. The lower the number is, the longer it stays even if becomes smaller on the screen. Should be higher than “Min Screen Size”.
Layer Count – Number of shells for this particular LOD. Should be lower than “Fur Layer Count”
Shell Bias – With value 0.0 the shells are distributed linearly from root to tip. With values larger than 0.0, distribution becomes nonlinear, pushing the shells more to the tip where the shells tend to be more visible if the layer count is relatively low. With low shell count, using bias > 0 can help reduce artefacts at the fur tip.
Fur Length – Scales the fur. If no fur splines are used, fur has length = 1.0 and will be scaled too.
Min Fur Length – Shortest possible fur length, will override too short fur splines.
Noise Strength – Introduces noise to the shell vertices along the normal. This helps to break up the uniformity of the shell slices when view from the side. May be a stylistic choice.
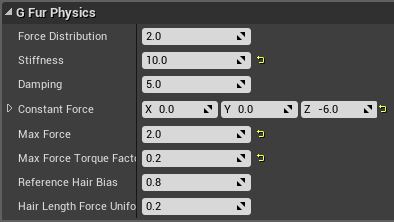
G Fur Physics
Force distribution – With value = 1.0, the forces affecting fur are distributed linearly from root to tip. Values above 1.0 push the forces more to the tip, leaving the lower parts of fur strands less affected.
Stiffness – Higher values make the fur bend less under the different forces.
Damping – How fast the fur loses energy from different forces and comes to stop.
Constant Force – Constant force affecting the fur. Usually this emulates gravity.
Max Force – Maximum allowed forces to act on the fur. This allows to clamp the motion of the fur if it’s too much for particular setup.
Max Force Torque Factor – Clamps the forces coming from rotational movement of the bones. This value is multiplying the “Max Force” parameter. At value 1.0, torque forces are effectively clamped with “Max Force”. Values below 1.0 clamp the torque forces even more than “Max Force”, values above 1.0 give more room to the torque forces that would be otherwise clamped if “Max Force Torque Factor” would be 1.0.
Reference Hair Bias – Length of the reference hair for which physics is calculated for. 1.0 takes longer hair into account, 0 takes more of the short hair into account.
Hair Length Force Uniformity – With value = 0.0, all the fur hair will bend closer to “Reference Hair”. Values closer to 1.0 will bend longer and shorter hair the same way.
Reference – gFur Shaders
gFur component is “sending” some useful information to the shader via UV channels. The following information is available to be used in the shader:
UV1.Red channel – absolute length
UV1.Green channel – non-linear relative length
UV2.Red channel – linear relative length
UV2.Green channel – relative length of fur spline, same for all shell layers
Standard Shader
01 – Basic
01. Base Colour – Colour of the fur if texture is not used, otherwise it tints the texture.
02. Base Texture – Albedo texture for fur strands.
03. Roughness – Low roughness = smooth and reflective surface, high roughness = less reflectivness.
04. Use Texture for Roughness – Use texture map for roughness + a few controlls to tweak the look.
05. Roughness Texture – Texture for per pixel roughness instead of the constant value.
06. Roughness Texture Offset – Makes the texture brighter or darker.
07. Roughness Texture Power – Roughness texture power/contrast.
08. Metallic – How metallic the surface is.
09. Use Normal Map – Use texture map for roughness + a few controlls to tweak the look.
10. Normal Map – Texture to be used as a normal map.
11. Normal Map Strength – Intensity of the normal map.
02 – Fur Pattern
01. Fur Pattern – Usually some sort of noise texture where white spots form the fur strands.
02. Fur Pattern Tiling – Tiling of the Fur Pattern texture.
03 – Fur Thickness
01. Fur Root Thickness – How thick is the fur strand at the base/root.
02. Fur Tip Thickness – How thick is the fur strand at the tip.
03. Thickness Root to Tip Distribution – How is the transitio between root and tip thickness distributed along the strand.
04. Alpha Offset – Finall offset for the Alpha to fix potential issues. Use very small values.
04 – AO
01. AO Strength – Adds fake AO to make the fur strands more visible/distinctive.
02. AO Power – AO power/contrast.
03. Fade Out Start – Until this distance, the fake AO is at full strength. Getting further away starts to fade out the fake AO. Should be smaller than “Fade Out End” parameter.
04. Fade Out End – After reaching Fade Out Distance, AO is no longer in effect. This avoids darkening the fur when further away from the camera.
05. Avoid Short – Offset – Offset for what is considered short for removing AO.
06. Avoid Short – Power – Removes AO from shorter fur strands.
08 – Rim Light
01. Use Rim Light – Whether to use fake Rim Lighting
02. Rim Light Strength – Strength of the Rim Light effect.
03. Fresnel Exponent – Fresnel expoenent for the Rim Light effect. Higher values push the effect more to the outer edges.
Advanced Shader
01 – Basic
01. Base Colour – Colour of the fur if texture is not used, otherwise it tints the texture.
02. Base Texture – Albedo texture for fur strands.
03. Tip Colour Controls – Allows to modify the colour of fur tips.
04. Base to Tip Distribution – With higher values, only the very tip of the fur strand will be affected by colour modifications.
05. Texture Power for Tip – Strength of the Base Texture at the tip.
06. Tip Hue Shift – Hue offset at the tip of fur strand.
07. Mask Contribution – Randomizes the Tip Hue Shift with a texture.
08. Hue Mask – Texture to randomize Hue Shift
09. Hue Mask Tiling – Tiling of the HUE mask texture.
10. Roughness – Low roughness = smooth and reflective surface, high roughness = less reflectivness.
11. Use Texture for Roughness – Use texture map for roughness + a few controlls to tweak the look.
12. Roughness Texture – Texture for per pixel roughness instead of the constant value.
13. Roughness Texture Offset – Makes the texture brighter or darker.
14. Roughness Texture Power – Roughness texture power/contrast.
15. Metallic – How metallic the surface is.
16. Fur Blend Mask – Composite texture. R = blend mask for Fur Pattern tiling, where black = 1st tiling, white = 2nd tiling. G = mask, where black = no fur, white = full fur. B = height variation texture.
17. Use Normal Map – Use texture map for roughness + a few controlls to tweak the look.
18. Normal Map – Texture to be used as a normal map.
19. Normal Map Strength – Intensity of the normal map.
02 – Fur Pattern
01. Fur Pattern – Usually some sort of noise texture where white spots form the fur strands.
02. Fur Pattern Tiling – Tiling of the Fur Pattern texture.
03. Second Density Controls – If second set of Fur Pattern Density should be used. Blend mask comes from the Fur Blend Mask.
04. Fur Pattern Tiling 2 – Second tiling of the Fur Pattern texture.
05. Height Variation – Amount of height variation. Texture comes from Blue channel of Fur Blend Mask.
03 – Fur Thickness
01. Fur Root Thickness – How thick is the fur strand at the base/root.
02. Fur Tip Thickness – How thick is the fur strand at the tip.
03. Thickness Root to Tip Distribution – How is the transitio between root and tip thickness distributed along the strand.
04. Use Second Thickness – Allows to use second set of thickness controls and blend between the two based on a texture. Texture comes from the Fur Blend Mask.
05. Second Base Thickness – How thick is the fur strand at the base/root.
06. Second Tip Thickness – How thick is the fur strand at the tip.
07. Second Thickness Root to Tip Distribution – How is the transitio between root and tip thickness distributed along the strand.
08. Compensation Power – Compensates for loss of thickness in fur due to mip maps.
09. Compensation Amount – Compensates for loss of thickness in fur due to mip maps.
10. Compensation Clamping – Compensates for loss of thickness in fur due to mip maps.
11. Alpha Offset – Finall offset for the Alpha to fix potential issues. Use very small values.
04 – AO
01. AO Strength – Adds fake AO to make the fur strands more visible/distinctive.
02. AO Power – AO power/contrast.
03. Fade Out Start – Until this distance, the fake AO is at full strength. Getting further away starts to fade out the fake AO. Should be smaller than “Fade Out End” parameter.
04. Fade Out End – After reaching Fade Out Distance, AO is no longer in effect. This avoids darkening the fur when further away from the camera.
05. Avoid Short – Offset – Offset for what is considered short for removing AO.
06. Avoid Short – Power – Removes AO from shorter fur strands.
05 – Clumping
01. Use Clumping – Use clumping effect on fur strands to break up the look of fur.
02. Amount – How much of the effect to use.
03. Clumping Root to Tip Distribution – Distribution of the clumping effect between root and tip of the fur strand.
04. Clumping Texture – This will offset the UVs used for the fur strands to make the fur look a bit bended and noisy instead of having upright strands.
05. Mask Tiling – Tiling of the Clumping Texture
06. Mask Values Offset – This offsets the values of texture so that grey becomes 0, black values become negative and are used for one direction, white values are used for the other direction.
If the texture doesn’t have ideal distribution from black to gray to white, you can use this value to further offset the texture to achieve the desired visuals.
07. Clumping Mask Power – Mask contrast/power.
06 – Wind
01. Use Wind Effect – Allows to use semi-procedural wind effect to add some motion to the strands.
02. Wind Intensity – Intensity of the wind effect.
03. Wind Weight – Weight effect weight.
04. Wind Speed – Wind speed.
05. Wind Offset – Additional offset.
06. Wind Root to Tip Distribution – Distribution of the wind effect between root and tip of the fur strand.
07. Fur Length Affects Wind Strength – How much to remove wind effect from short hair.
08. Fur Length Power – Power/Contrast for fur length affecting wind strength.
09. Use Second Layer (WL2) – Allows to use second layer of wind effect.
10. WL2 Strength – Overall strength of the effect.
11. WL2 Texture – Noise texture used for the second layer of the wind effect.
12. WL2 Texture Power – Wind Texture contrast/power.
13. WL2 Texture Offset – Default = 0.5. Allows to offset/change direction of the effect.
14. WL2 Texture Tiling – Mask tiling.
15. WL2 Mask Rotation Amount – How much will the wind mask texture rotate.
16. WL2 Mask Rotation Speed – Speed at which the rotation cycle will happen.
17. WL2 Mask Translation Amount – How much will the wind mask move.
18. WL2 Mask Translation Speed – Speed at which the translation cycle will happen.
08 – Rim Light
01. Use Rim Light – Whether to use fake Rim Lighting
02. Rim Light Strength – Strength of the Rim Light effect.
03. Fresnel Exponent – Fresnel expoenent for the Rim Light effect. Higher values push the effect more to the outer edges.

